
TL;DR: To color fill laser-etched granite, clean and engrave the stone, brush compatible paint into the etched areas, and carefully remove excess paint from the polished surface. Touch up the image and apply a compatible clear coat if the paint system requires it. Test laser settings, paint, and cleanup on a practice granite tile first. Outdoor color may fade and need refreshing.
A Beginner’s Guide to Engraving, Color Filling, and Caring for Granite Memorials.
Color filling laser-etched granite means brushing paint into the engraved image, then carefully removing excess paint from the surrounding polished surface. The laser creates the image in the stone; the paint adds color to portraits, flowers, lettering, and other personal details.
For monument retailers, funeral homes, and engraving businesses, this technique offers another way to help families tell a loved one’s story. A familiar blue shirt, a favorite flower, or a pet’s distinctive markings can make a memorial feel more personal.
Start with small black granite tiles. Use them to learn how engraving settings, paint application, and cleanup work together before coloring a customer’s memorial.
Before You Begin:
If this piece will be placed in a cemetery, check that cemetery’s rules for painted and engraved memorials before starting. Confirm that your design, color choices, and materials are permitted, and get any required approval before engraving or painting.
What You’ll Need to Get Started
- A polished black granite practice tile suitable for laser engraving.
- Small paintbrushes, including a fine brush for details.
- Paint suitable for the stone and for outdoor use if the piece will go outside.
- A stone-safe cleaner and lint-free cloths.
- A plastic scraper.
- A clear coat recommended for your paint, if needed.
- The original color photo to use as a reference.
- Gloves, eye protection, and a work area with the ventilation your paint requires.
You can find practice pieces in the AP Lazer webstore.
Start with a simple image, such as a flower or a design with a few larger areas to paint.
How to Color Fill Laser-Etched Granite: Step by Step
1. Choose the Right Paints
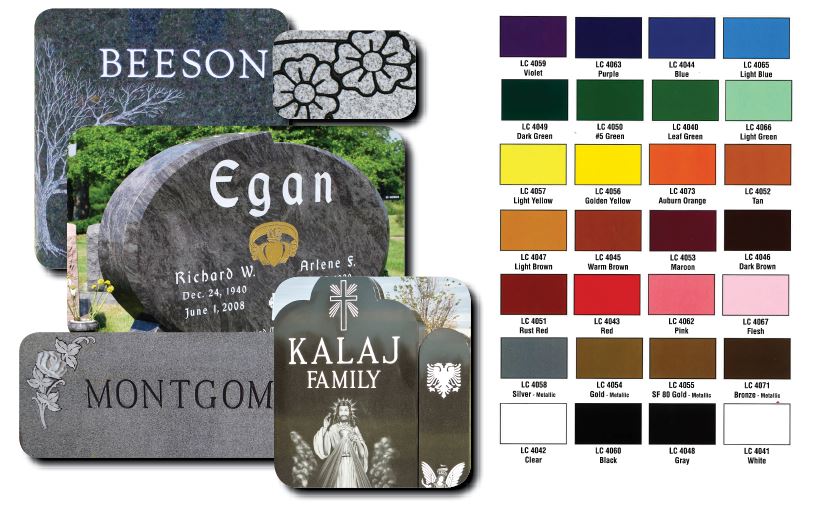
For your first project, start by shopping for stone or monument paint made for granite, such as Lithichrome’s Lithco Colors. This range is intended for coloring stone designs and includes brush-application instructions.
Before ordering, confirm that it will work with your shallow laser etching and the cleanup method you plan to use. See the Lithichrome color guide.
Buy small containers of red, yellow, blue, and white to start, choosing colors from the same range that can be mixed together. For a portrait, ready-made browns and skin-tone shades can make matching your photo easier. If the piece will go outside, confirm that the paint is suitable for outdoor use, and purchase the recommended cleaner or thinner and clear coat only if the instructions call for them.
Try the paint on a spare engraved granite tile before using it on a memorial.
This lets you check the color, how well it stays in the engraving, and how easily the extra paint comes off.
2. Clean the Granite Surface
Remove dirt, fingerprints, and residue with a stone-safe cleaner. If you use a generic cleaner, confirm that it is suitable for the stone and its finish, before use. Use alcohol only when compatible with the surface treatment and paint system.
Let the surface dry completely before engraving.
After engraving, remove loose residue and prepare the etched area for painting according to the coating supplier’s instructions.
Keep solvents away from the operating laser and ignition sources.
3. Engrave a Practice Image
For the color-filling technique described here, compare samples at 125 and 150 DPI. If you need more separation between engraved dots, include a 110 DPI sample.
Note: These are starting points for testing, not universal AP Lazer machine settings. Results depend on the granite, laser source, wattage, focus, speed, and image preparation.
DPI controls dot spacing; it does not directly set engraving depth. Adjust power and speed gradually within the machine’s recommended range, changing one variable at a time. Higher energy can enlarge the marks or damage fine detail, so deeper is not automatically better.
Paint-fill with a simple white patio paint and clean each test sample before choosing your final settings.
Judge the finished result, including facial features, shading, paint retention, and the surrounding polish.
For a broader introduction, read AP Lazer’s granite engraving tips and techniques.

4. Begin Painting your Granite
Keep your reference photo beside the granite tile. Use a small brush to work paint into the engraved areas, starting with something easy to follow, such as a shirt or flower petals.
Apply thin layers rather than one heavy coat. Let each layer dry as directed before adding more.
You may get a little paint on the smooth granite around the image. You’ll remove that in the next step. For now, concentrate on filling the areas you want to color.
For a portrait, follow the light and dark areas in the original photo. Those shadows and highlights help the face keep its shape.

5. Remove the Extra Paint
This is the part to practice carefully. The paint should stay in the engraved areas while the excess comes off the surrounding polished surface. Timing varies with the paint, so test a small area before cleaning the whole granite tile.
Start with a plastic scraper and work gently. If paint pulls out of the image, stop and check the drying directions before continuing.
Some finishes allow careful use of a fresh razor blade in a holder, held at a shallow angle. Test it on a spare piece first—scraping can damage a finish. The Natural Stone Institute’s care guide includes advice on removing small paint deposits.
6. Refine the Surface and Touch Up Details
Look over the tile in good light. Use your fine brush to fill any missed spots and add smaller details. Let those areas dry, then gently clean away any extra paint again.
If needed, go in with a #0000 extra-fine steel wool. Use it gently to remove any remaining surface residue. Avoid heavy pressure or rubbing paint out of the engraved areas. Remove any loose wool fibers afterward.
Note: Remember to step back occasionally and compare the piece with your photo. It’s easier to judge the overall image when you’re not looking at it from just a few inches away.
If you have an area on your piece where paint is being removed where it shouldn’t be, you may need to check your image and laser settings and apply a higher power to that area, starting again from step 3.
7. Finish and Let It Cure
If your paint needs a clear coat, use the product recommended by the supplier.
For an outdoor piece, ask about UV protection.
Try the clear coat on your practice granite tile first, since it can change the shine and appearance of the black background.
Follow the directions for application and curing. Paint that feels dry to the touch may still need more time before the piece is ready to handle, package, or install.
If the chosen finish requires spraying a product containing isocyanates, have a properly equipped professional apply it. These products need specialist spray protection, as explained in HSE’s guidance.

Frequently Asked Questions About Color Filled Granite
How long will the color last outside?
That depends on the paint, preparation, sunlight, and weather.
Outdoor color can fade and may need refreshing.
If you’re making a piece for a customer, explain that the painted finish will need care over time.
Will the engraving disappear if the paint fades?
No. Fading paint does not remove the image etched into the stone.
Old paint or clear coat may affect how it looks, though.
Can I repaint an older piece?
Often, yes.
First, find out what paint and finish are already on it so you can choose a suitable way to prepare the surface.
Test before using a remover, since some products can damage the finish.
If you don’t know what was used, ask a stone-care professional before stripping or repainting it.
Bring More Personal Stories to Life With AP Lazer

Choose a simple design, set out your brushes, and give yourself time to practice. Your first granite tile will help you learn how much paint to use, when to clean it off, and how to handle the smaller details.
Once you’re happy with the result, you’ll have a sample to show customers, and a process you can repeat with more confidence.
Need help getting the engraving ready?
Call us at 800-585-8617 or hit the button below to meet with one of our many amazing team members and talk through your project, today!