
TL;DR: Learn how to laser engrave a photo on painted glass with an AP Lazer 100-Watt CO2 laser. This step-by-step glass engraving guide covers preparing a portrait in Corel PHOTO-PAINT or Adobe Photoshop, saving it as a high-resolution PNG instead of a DXF file, choosing the right LightBurn photo engraving settings, and creating a detailed custom glass portrait. Use the included speed, power, DPI, and dithering settings as a starting point, then test them on your own painted glass for the best results.
Before You Begin
Painted glass gives photo engraving a bold, dramatic look. The dark surface makes the lighter engraved areas stand out, while details such as faces, hair, and fur give the finished piece plenty of personality.
This project starts with a favorite photo and an 8 x 10-inch piece of painted glass. First, you will prepare the portrait in either Corel PHOTO-PAINT or Adobe Photoshop. Then you will bring it into LightBurn, preview the engraving, and send it to your AP Lazer.
You only need to follow one photo-editing walkthrough. Choose the program you are most comfortable using, then move on to the LightBurn section.
Feel free to download the file below and follow along with the above step-by-step video while working your way through this blog.
Choose Your Photo-Preparation Workflow
This tutorial will demonstrate two photo preperation workflows:
1. Corel PHOTO-PAINT, with Cutout Lab for manual subject isolation.
2. Adobe Photoshop, with Select Subject for faster automatic isolation.
You only need to complete one of these workflows. Both lead to a transparent PNG that will then be imported into LightBurn for actual laser processing.
Corel PHOTO-PAINT Walkthrough
Step 1: Create an 8 x 10-Inch Project
Video timestamp: 0:17
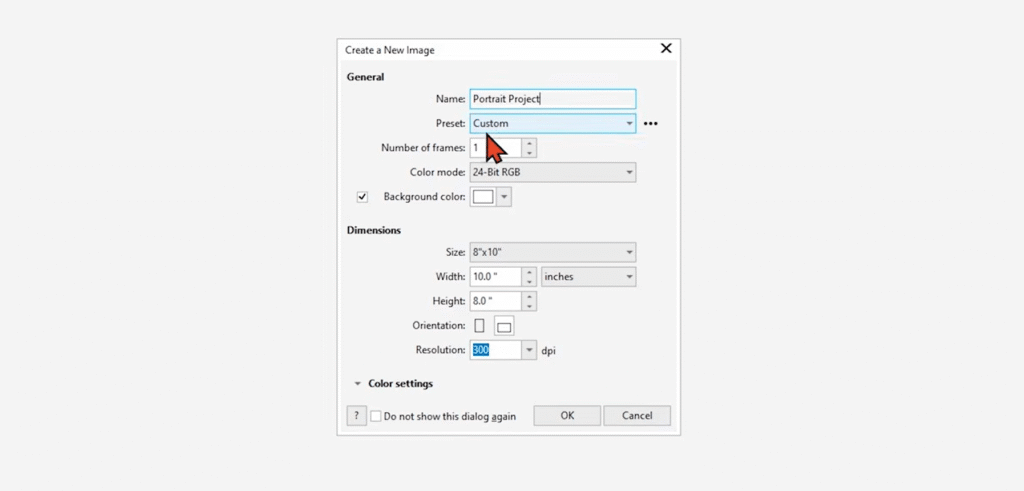
Open Corel PHOTO-PAINT and start a new project.
Use these project details:
- Width: 10 inches
- Height: 8 inches
- Position: Landscape
- Resolution: 300 DPI
NOTE: DPI means dots per inch. Starting at 300 DPI gives you enough detail without making the file slow to work with.
Give the project a name you will recognize later and save to your computer.
Step 2: Open Your Photo
Video timestamp: 1:05
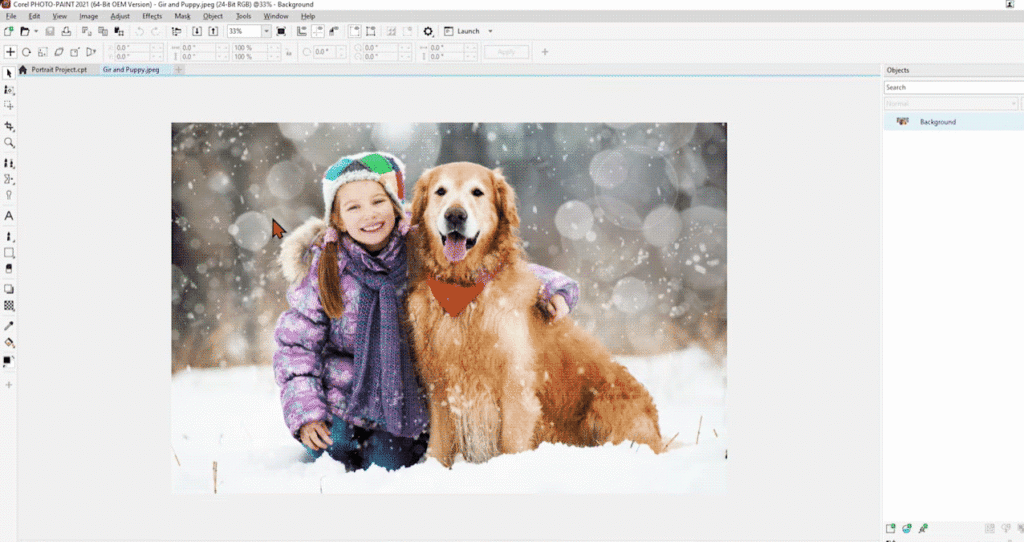
Open the photo you want to engrave. It should appear in its own tab.
Take a moment to decide what you want to keep. You can use the full photo, remove the background, or replace it with something simpler.
For a clean portrait, keep the people or pets and remove the original background.
Step 3: Remove the Background
Video timestamp: 1:44
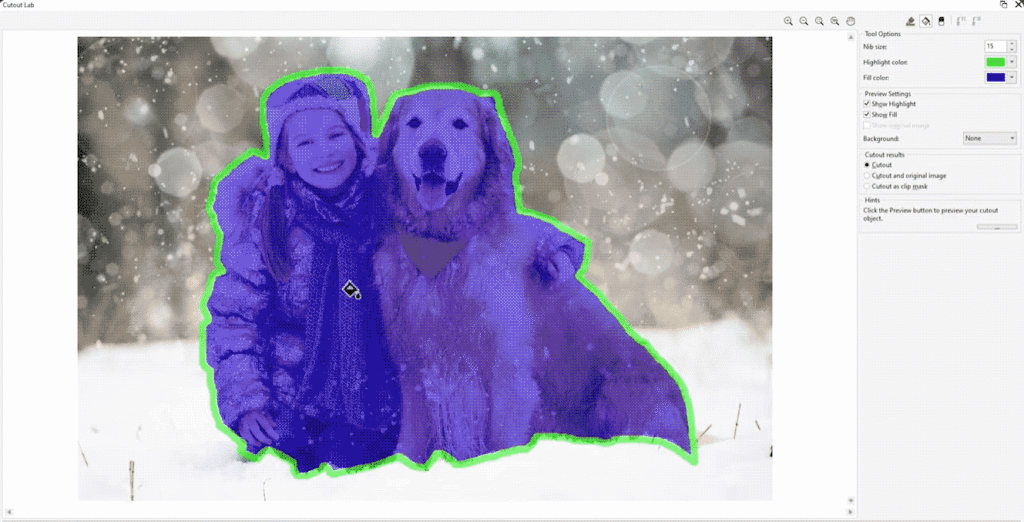
Go to Image > Cutout Lab.
Choose the Highlighter tool and trace around the outside of your subject. A nib size of 15 works well for this 8 x 10-inch portrait.
Keep the trace just outside hair, fur, and clothing. You do not need to follow every tiny strand. Leaving a little extra room will help you create a softer edge in the next step.
When the outline is complete:
- Choose the Inside Fill tool.
- Click inside the subject.
- Select Preview.
- Check that the right areas are filled.
- Click OK.
A graphics tablet can make tracing easier, especially around hair and fur, but a mouse will work too.
Step 4: Soften the Edges
Video timestamp: 3:27
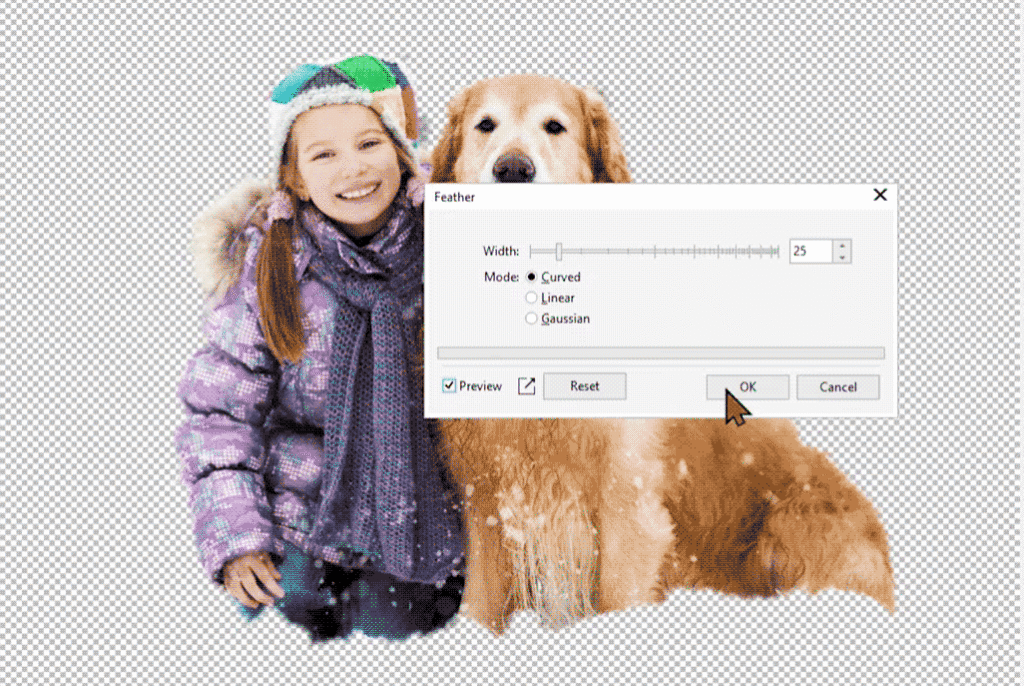
Freshly removed backgrounds can leave a rough edge.
A little feathering will blend that edge and make the portrait feel more natural.
Go to Effects > Blur > Feather.
Try a feather setting of 25. Turn Preview on and off so you can compare the change.
Look closely around hair, hats, shoulders, and fur.The edge should feel soft, but the subject should not look blurry.
Click OK when you are happy with it.
Step 5: Add the Subject to Your Project
Video timestamp: 4:11
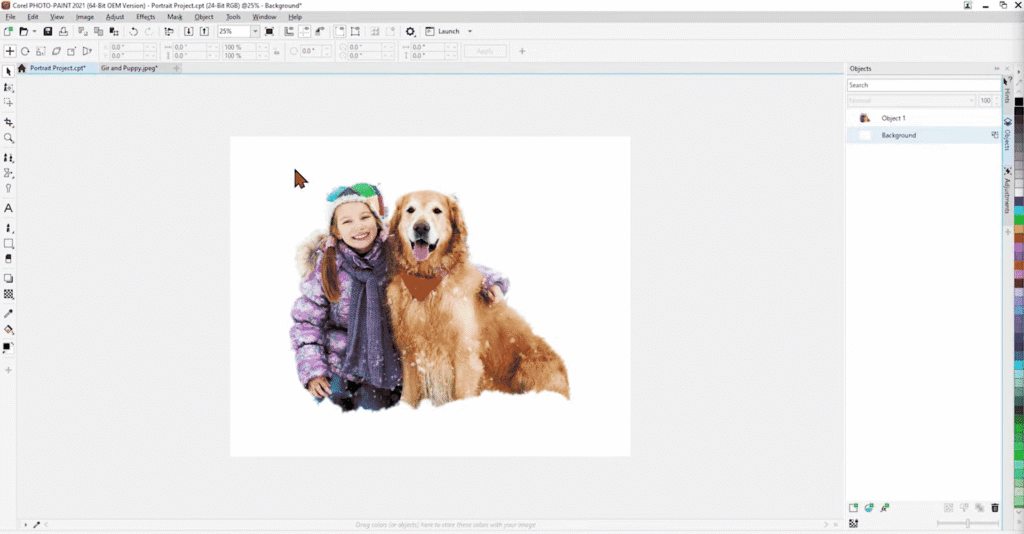
Copy the cutout portrait and paste it into your 8 x 10-inch project.
Resize it to fit the glass. Keep the proportions locked so faces and other features do not stretch.
Leave a comfortable amount of space around the portrait. Make sure no important part of the image falls outside the page.
Step 6: Remove the Color
Video timestamp: 4:53
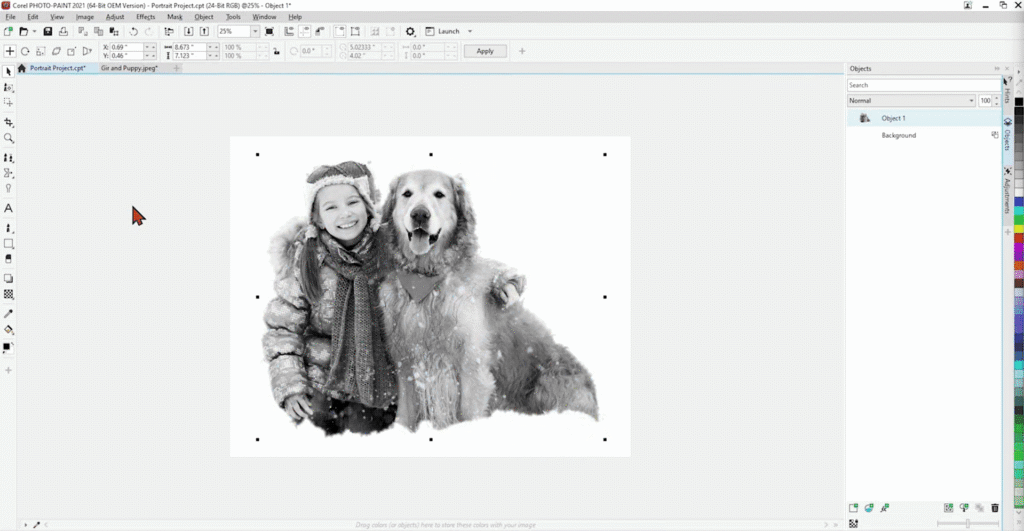
Select the portrait, then go to Adjust > Desaturate.
This removes the color and gives you a better sense of how the image will look as an engraving.
Check the faces and other important details. You should still see a good mix of light areas, dark areas, and middle tones.
Step 7: Sharpen the Important Details
Video timestamp: 5:16
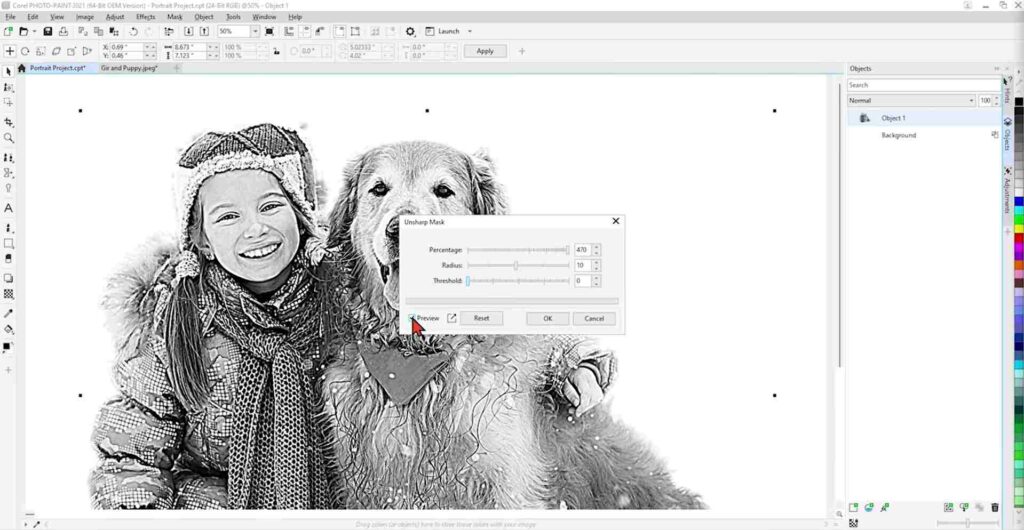
Go to Effects > Sharpen > Unsharp Mask.
Use these values as a starting point for this portrait:
- Percentage: 470
- Radius: 12
- Threshold: 0
Turn Preview on and off while you work.
The portrait should look crisp and a little stronger than a normal photo. Eyes, smiles, fur, and clothing texture should be easy to see.
If the picture starts to look like a cartoon, lower the Radius.
Step 8: Increase the Resolution
Video timestamp: 6:44
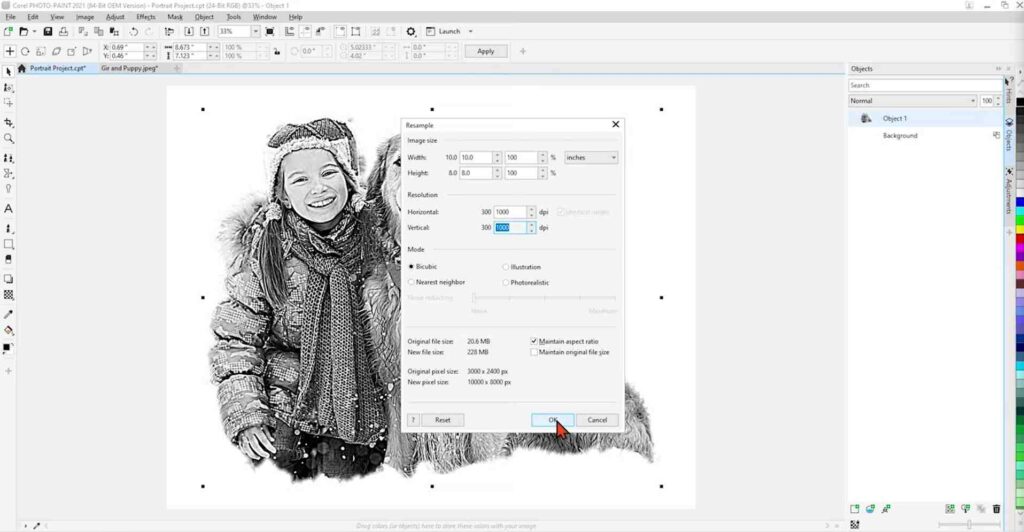
Go to Image > Resample.
Change the resolution from 300 DPI to 1,000 DPI. Keep the finished size at 10 x 8 inches.
This gives LightBurn more picture detail to work with. It may take a moment for the change to finish.
Step 9: Save the Portrait as a PNG
Video timestamp: 7:19
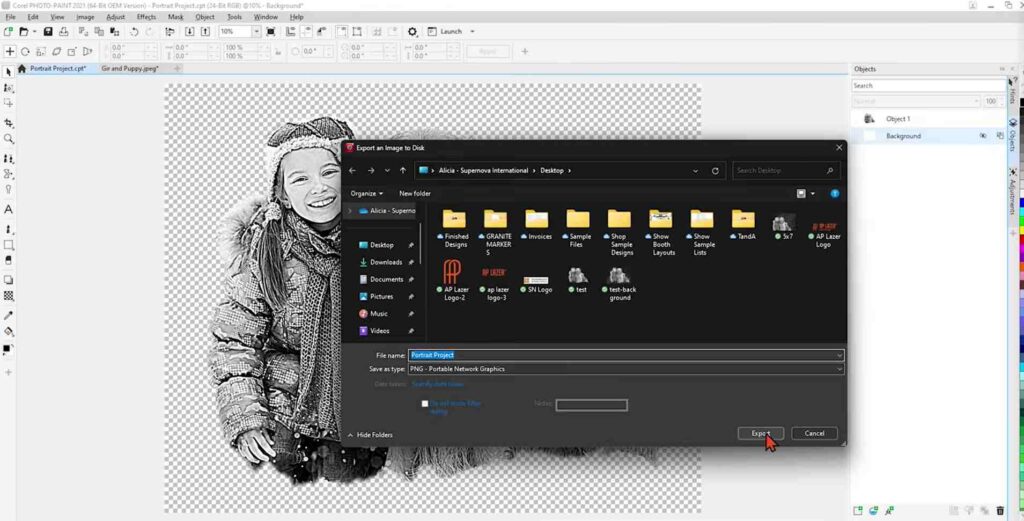
Hide the background layer. The empty area around the subject should show a checkerboard pattern.
Go to File > Export and save the portrait as a PNG.
Choose the flattened option when prompted.
Before moving on, open the saved image and make sure there is no white box behind the subject.
If everything looks good, you can now import your artwork into LightBurn and begin laser processing.
Adobe Photoshop Walkthrough
Step 1: Create the Project
Video timestamp: 8:04
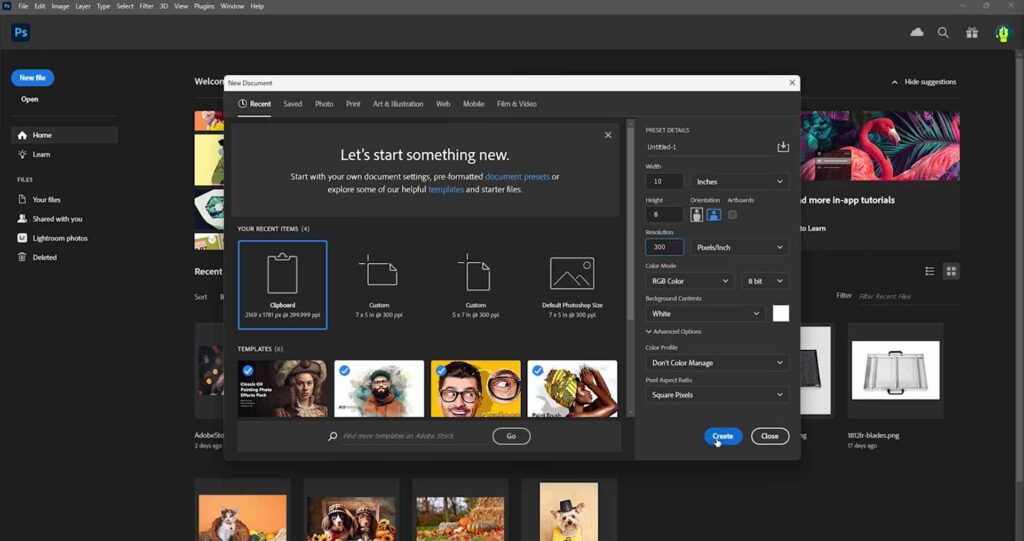
Create a new Photoshop project with these details:
- Width: 10 inches
- Height: 8 inches
- Position: Landscape
- Resolution: 300 pixels per inch
Then open your photo in a separate tab.
Step 2: Select the Subject
Video timestamp: 9:05
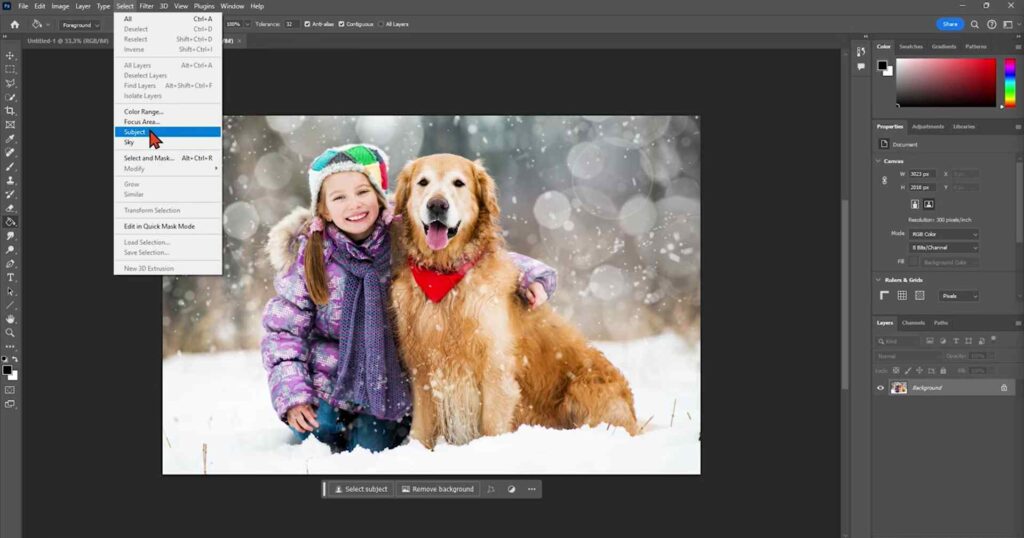
Go to Select > Subject.
Photoshop will find the main people or pets for you.
Zoom in and check the selection around hair, fur, hats, hands, and clothing.
Copy the selected subject and paste it into the 8 x 10-inch project.
Resize and position the portrait. Keep the proportions locked so the image stays natural.
Step 3: Remove the Color
Video timestamp: 9:46
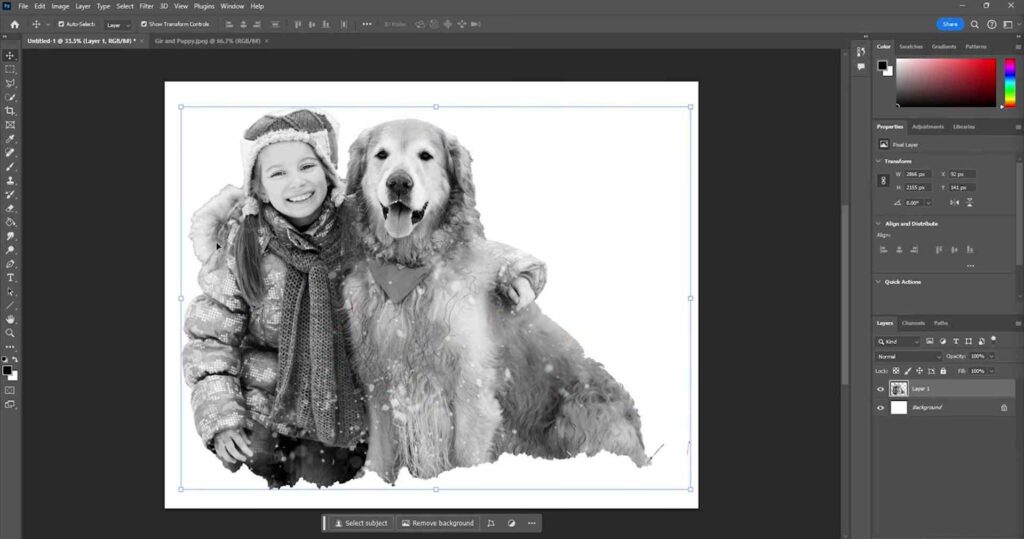
Select the portrait layer.
Go to Image > Adjustments > Desaturate.
The photo will change to black and white. Make sure the faces and important features still have clear detail.
Step 4: Sharpen the Portrait
Video timestamp: 9:58
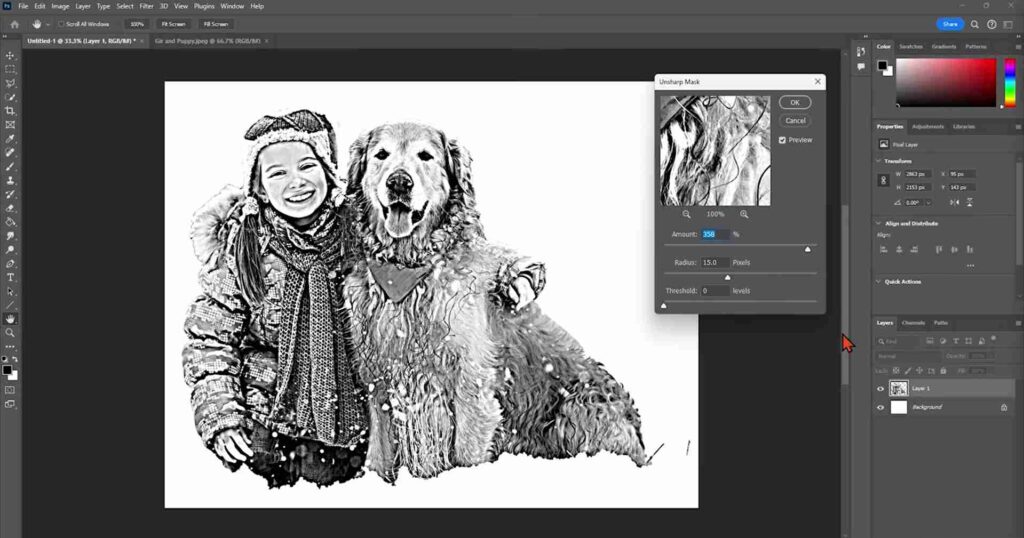
Go to Filter > Sharpen > Unsharp Mask.
For this portrait, the Amount is set to 358 percent. Threshold stays at zero. The Radius is lowered until the picture looks crisp without becoming harsh.
A Radius near 7 pixels is a useful reference for this image, but your photo may need something different.
Watch the face, eyes, hair, and fur while you adjust the slider. Stop when the details are strong and easy to recognize.
Step 5: Increase the Resolution and Save
Video timestamp: 10:47
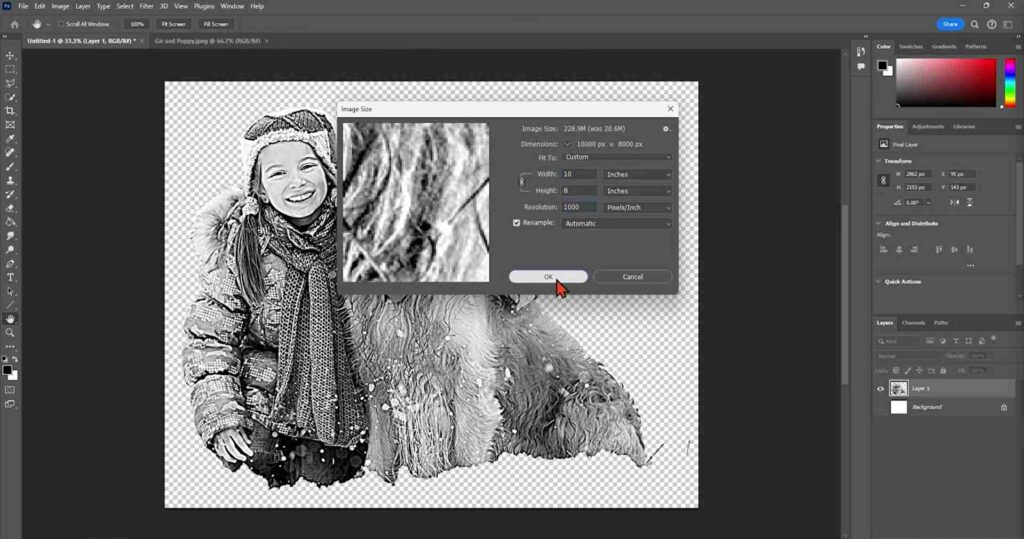
Hide the background layer.
Go to Image > Image Size. Change the resolution from 300 to 1,000 pixels per inch.
Keep the finished size at 10 x 8 inches.
Next, go to File > Export > Export As and choose PNG.
Save the image and make sure the area around the subject is clear, not white.
You are now ready to begin the laser processing process in LightBurn!
Prepare the Photo in LightBurn
The editing work is finished. From here, the Corel PHOTO-PAINT and Adobe Photoshop paths come together.
Step 1: Bring the PNG into LightBurn
Video timestamp: 12:08
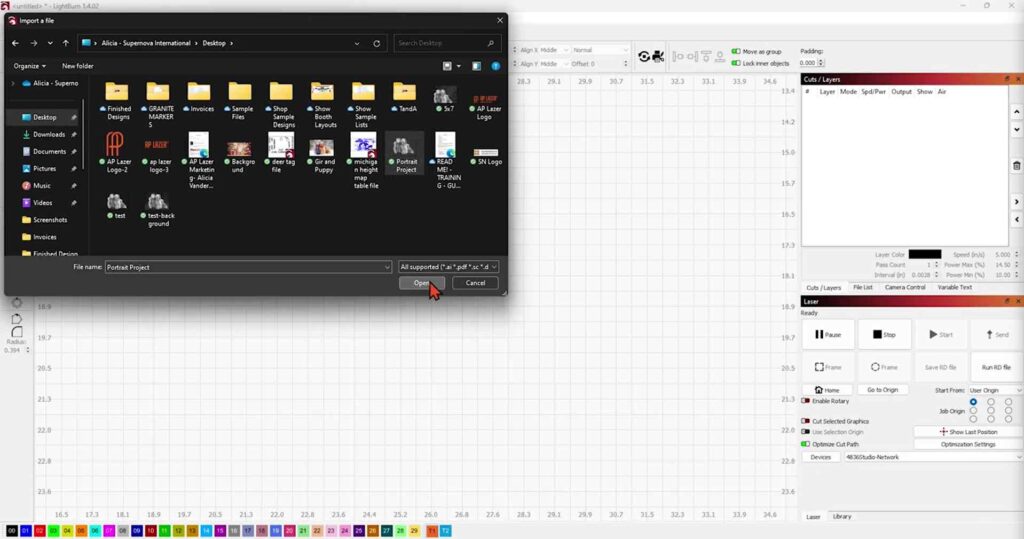
Open LightBurn and bring in your finished PNG image.
Check the width and height. The image should still measure 10 x 8 inches.
You should see only the portrait, with no white box around it.
Step 2: Begin Image Adjustments and Setup
Video timestamp: 12:36
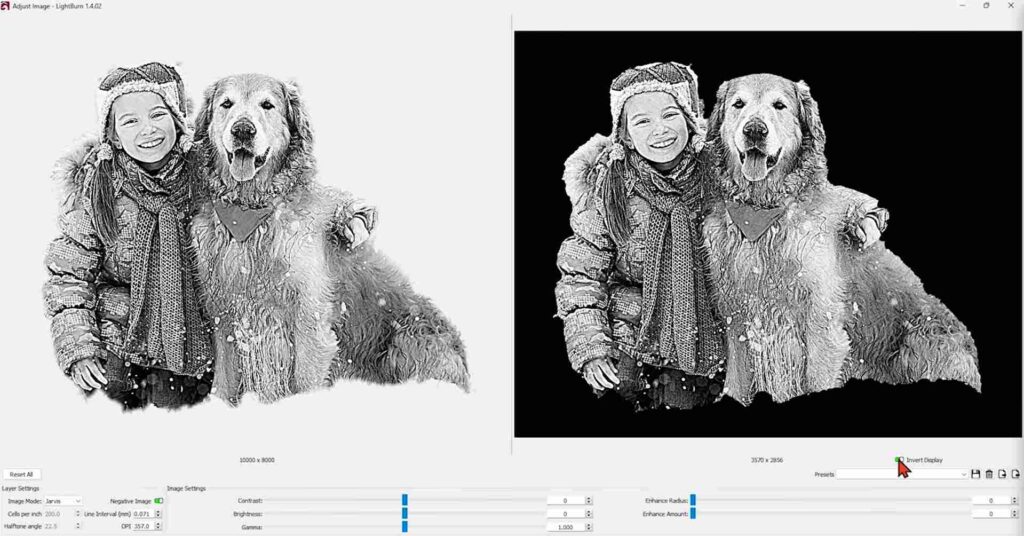
Right-click the portrait and choose “Adjust Image”.
Turn on “Negative Image.” This tells LightBurn that you are working on a dark surface. The dark paint stays dark, while the lighter parts of the portrait become the engraved areas.
Turn on “Invert Display” to preview the portrait against a dark background.
You should now have a much better idea of how the finished glass will look.
Step 3: Choose Your Dithering Style
Video timestamp: 13:16
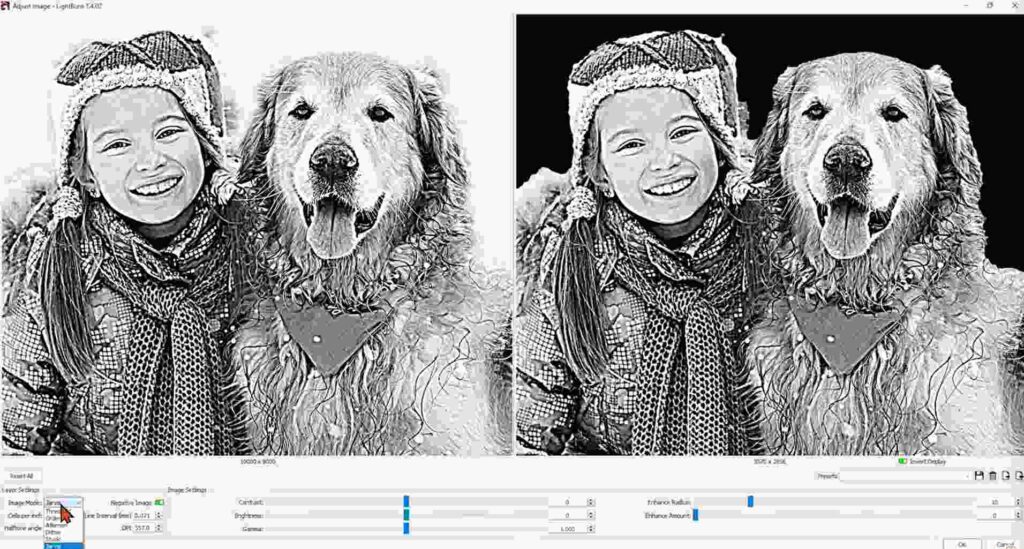
Choose “Jarvis” as the image style.
Jarvis breaks the shades in the portrait into a fine pattern of dots. This helps create smooth details in faces, hair, clothing, and fur.
Keep the engraving between 300 and 360 DPI for this painted-glass project.
The settings we used for this project were a 0.0028-inch line interval, or 357 DPI.
More DPI does not always mean a better picture!
If the dots sit too close together, the portrait can lose detail. If they sit too far apart, the image can look grainy.
Click “OK” when the preview looks balanced.
Adjust your Laser Settings in LightBurn
Step 1: Open the Image Settings
Video timestamp: 14:15
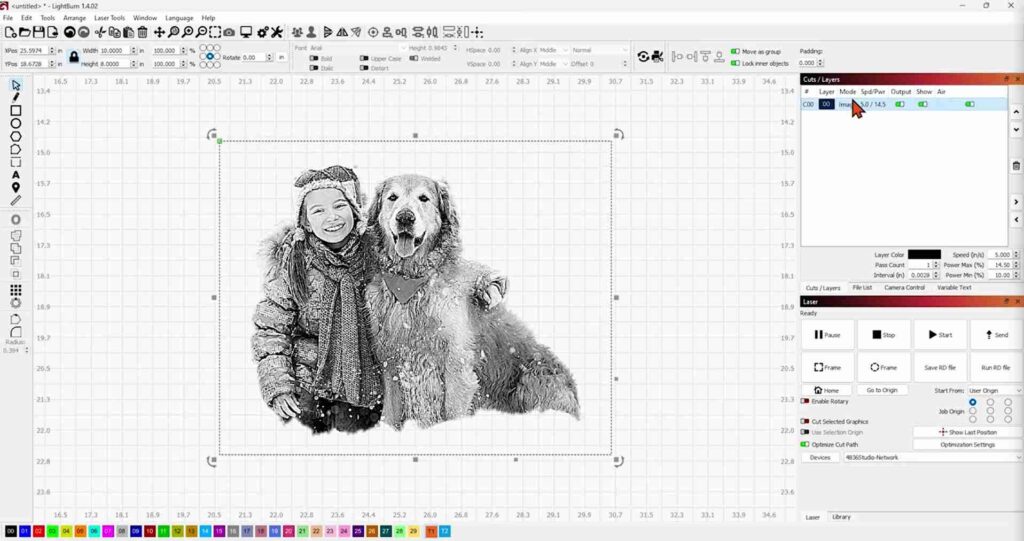
Double-click the portrait’s color layer.
Make sure the job is set to “Image” and the image style is “Jarvis”.
Step 2: Enter the Starting Settings
Video timestamp: 14:46
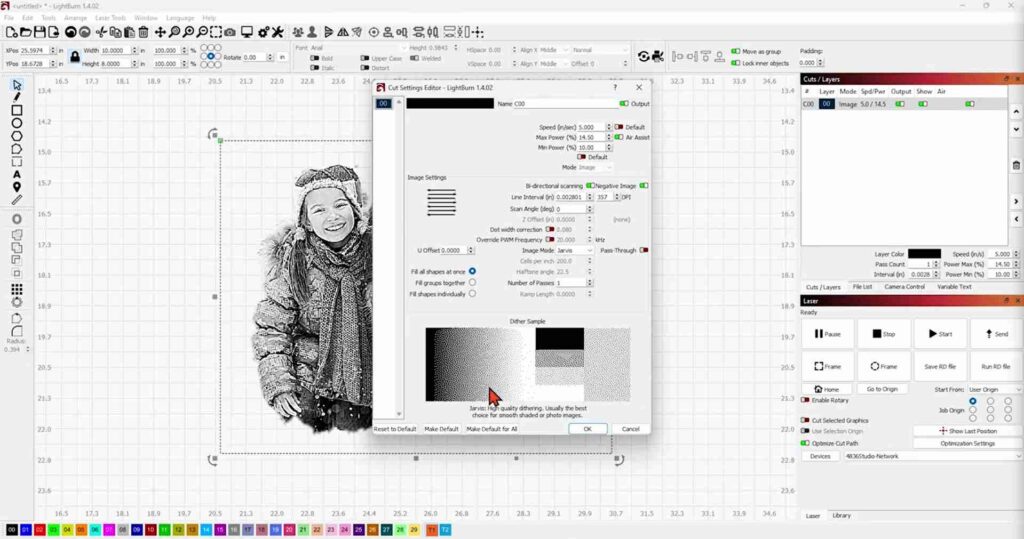
These settings were used on an AP Lazer SN4836LR with a 100-watt CO2 laser:
- Speed: 5 inches per second
- Maximum power: 14.5 percent
- Minimum power: 10 percent
- Line interval: 0.0028 inch
- Resolution shown in LightBurn: 357 DPI
- Passes: 1
Use these as a tested reference, not a promise that every piece of painted glass will react the same way.
If your laser is below 100-watts, try raising the power a bit, but keep the speed the same.
Run a small test on a scrap piece of glass before engraving the final portrait.
Position and Engrave the Glass
Step 1: Check the Placement
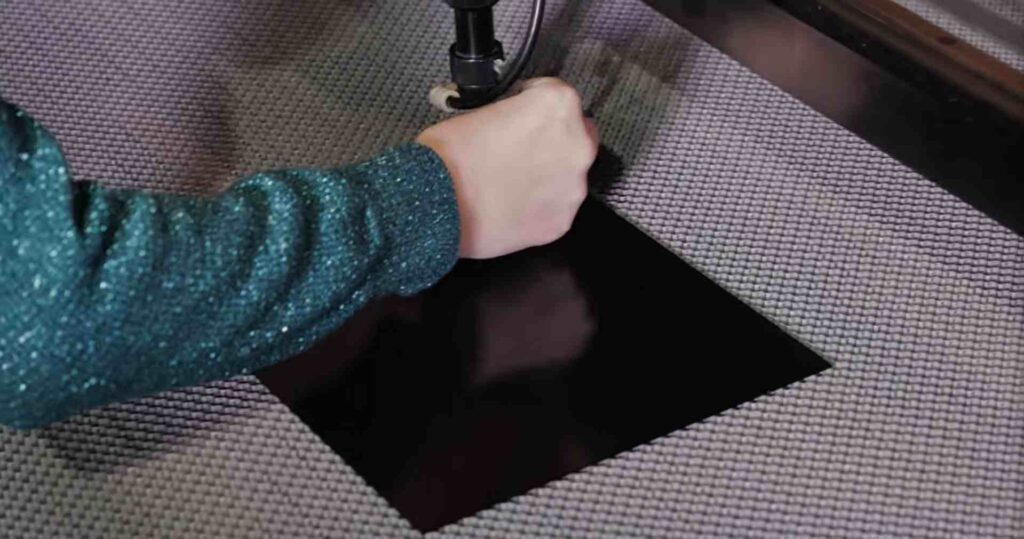
Place the painted glass in the machine and focus it using your usual AP Lazer process.
Set the starting point in LightBurn to match the position of the glass. Check that the portrait is facing the right direction and fits inside the panel.
Use your normal framing process to confirm the placement before you begin.
Step 2: Do One Final Check
Before sending the job, confirm:
- The glass is clean and correctly positioned.
- The machine is focused.
- The exhaust is running.
- The portrait measures 10 x 8 inches.
- Negative Image is on.
- Jarvis is selected.
- The starting point is correct.
- The tested speed and power settings are entered.
Step 3: Start the Engraving
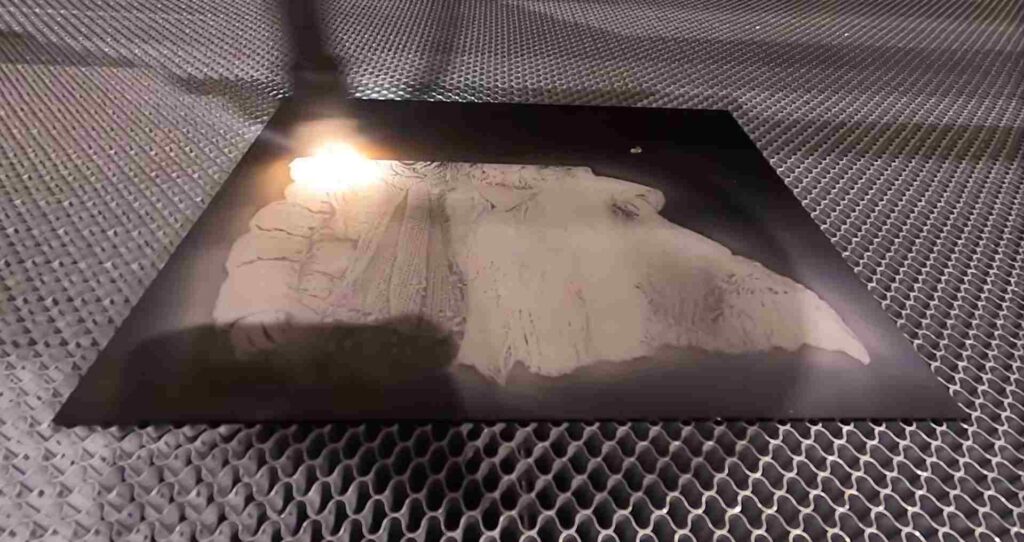
Send the job to the machine and begin the engraving!
Reminder: stay with the machine and follow your usual safety practices while it runs.
The Completed Project & Final Thoughts
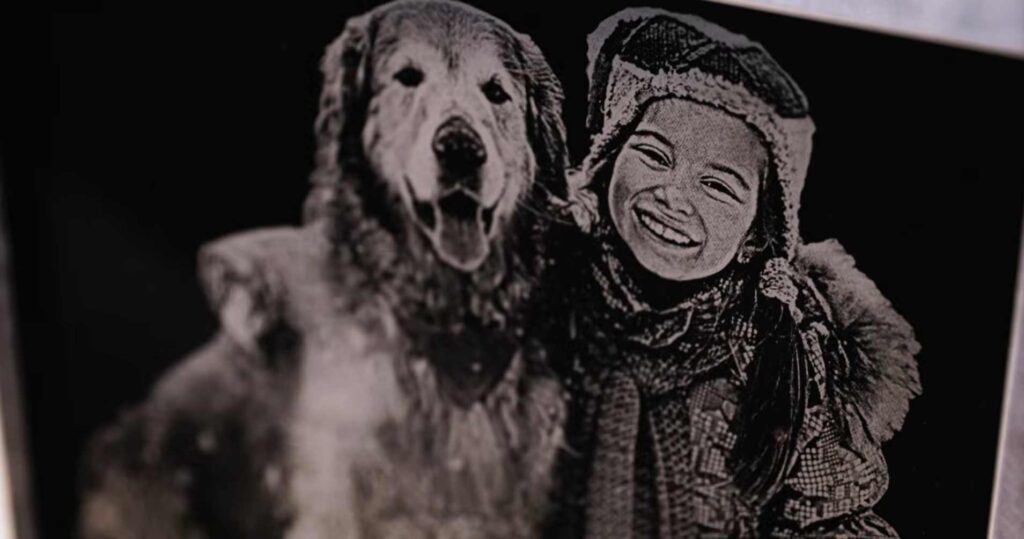
The finished piece is more than a photo on glass. It is a personal keepsake that brings out the details and emotion of the original image in a completely new way. Once you are comfortable preparing the artwork and testing your settings, you can use this same process to create family portraits, pet memorials, personalized gifts, awards, and one-of-a-kind display pieces.
Looking for more ideas?
Explore AP Lazer’s glass engraving applications or learn more about the current SN4836DLR laser machine.
If you need help choosing a machine for the products you want to create, contact an AP Lazer specialist or call us today at 800-585-8617.